Haven't signed into your Scholastic account before?
Teachers, not yet a subscriber?
Subscribers receive access to the website and print magazine.
You are being redirecting to Scholastic's authentication page...
Announcements & Tutorials
Renew Now, Pay Later
Sharing Google Activities
2 min.
Setting Up Student View
Exploring Your Issue
Using Text to Speech
Join Our Facebook Group!
Subscriber Only Resources
Access this article and hundreds more like it with a subscription to Scholastic Art magazine.
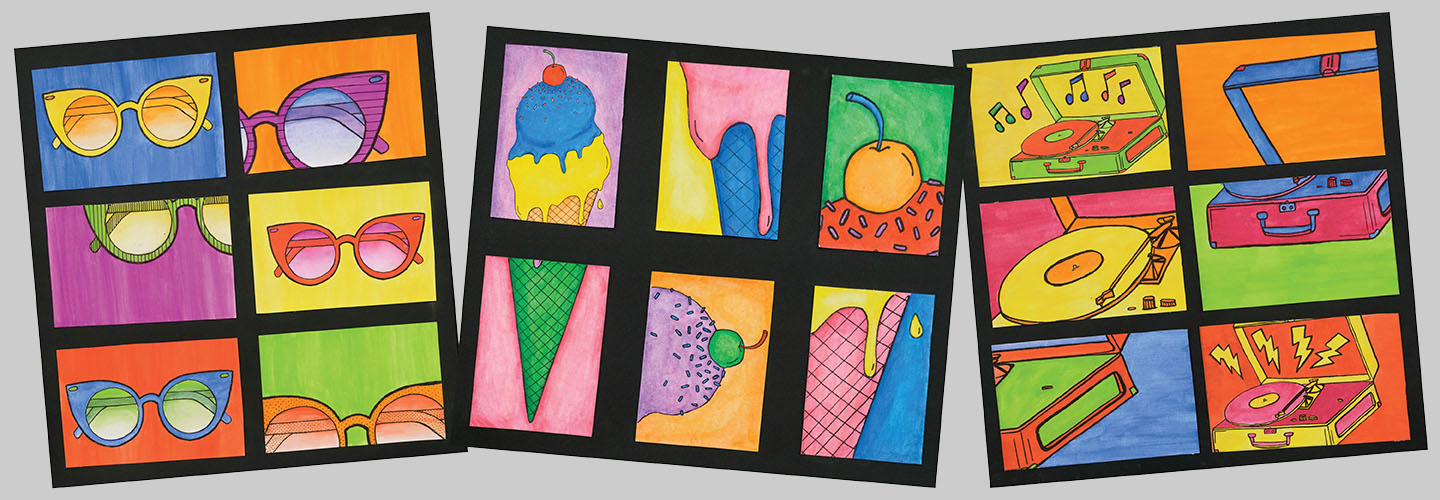
How do the students who created these use color? Add variation? Experiment with scale?
Article Options
Presentation View
Paint in Pop
Use what you’ve learned about American Pop Art to explore repetition and variation
You’ve seen how Pop artists like Andy Warhol made artworks featuring commonplace objects to share their ideas about contemporary culture. Now it’s your turn to choose an object, make a line drawing, and use repetition and variation to make a statement.
sketchbook
objects for drawing from observation (e.g., soup cans, cupcakes, fresh fruit/veggies, still life objects)
8.5"×11" drawing paper
pencils
black fine-tip markers
card stock printer paper (110 lb, white, letter size)
computer and scanner
printer
watercolor paint
variety of paintbrushes
scissors
double-sided tape
black poster paper/board for mounting
Step 1: Compose a Line Drawing
Create a crisp, clean line drawing.
Look at the artworks featured in this issue of Scholastic Art. What themes do the artists explore? How do the subjects of their work reflect these themes? Select an object that represents daily life or today’s culture. You might choose an object that refers to contemporary entertainment, life at school, or even depict a popular food. Make a few quick observational drawings of your everyday object in your sketchbook. Then on a sheet of 8.5"×11" drawing paper, make your final drawing. Keep it simple, rendering only the most important lines. Your goal is to make a crisp, graphic drawing capturing the object’s most important shapes. This will help viewers recognize your object right away. When you are satisfied with your line drawing, outline it with a fine-tip black marker.
Tip: When making your sketches, experiment by drawing your object from a variety of viewpoints.
Step 2: Scan and Create Multiples
Digitally manipulate your drawing.
Scan your line drawing and upload it to a computer. Then use an editing program to experiment with different ways of manipulating your image. Use the zoom tool to play with scale. The crop tool can help you emphasize different parts of your drawing. Compose four to nine manipulated versions of your image. Remember that the more versions you make, the more options you will have when making your final composition. Print your multiples on 110 lb card stock. Use scissors to trim the edges. Then begin thinking about how you will arrange the images to create a single, unified work.
Tip: Consider the scale of your images as you work. Then you’ll be able to easily arrange them later.
Step 3: Add Color and Arrange
Paint your multiples, and then create a dynamic arrangement.
Establish a color palette using watercolor paints. Experiment with bright colors that echo a Pop Art aesthetic. Remember that you can use color to create variation. Play with arbitrary (not natural) colors. Be consistent as you work, trying to keep the paint saturation and brushstrokes even. This will help you create an overall sense of unity.
After you finish painting, allow your work to dry. Then try arranging your images in different ways to create a dynamic final composition. Once you find the best arrangement, use double-sided tape to attach your painted images to black poster paper or poster board.
Tip: Don’t feel forced to arrange your images in a grid. Offsetting them can add unexpected excitement.
Prepared by: Lisa Yamaoka, South Kamloops Secondary School, Kamloops, British Columbia, Canada
Article Type